Shell 自动补全 + 终端美化汇总:zsh、cmd 和 powershell
Published:
zsh 是一个兼容 bash 的 shell, 还提供了强大的自动补全功能,并拥有丰富的主题和插件支持。Oh-my-zsh 项目提供了很多漂亮的主题,其中我个人比较喜欢的是 powerlevel10k。由于它实在美观,了解到美化 windows 终端的 oh-my-posh 后,我也把 cmd 和 powershell 一并美化成了 powerlevel10k 的风格,并通过 Clink 实现了自动补全功能。具体的操作步骤在此记录。
zsh
安装 zsh
以下以 WSL2(Ubuntu 22.04) 环境为例。可以直接通过 apt-get 安装 zsh。
sudo apt-get install zsh
使用 chsh -s /bin/zsh 命令将 zsh 设置为系统默认 shell。新开一个 shell,完成初步配置,zsh 就安装好了。
安装 oh-my-zsh
可以使用 curl 安装 oh-my-zsh:
sh -c "$(curl -fsSL https://raw.github.com/ohmyzsh/ohmyzsh/master/tools/install.sh)"
安装完成后,执行 ls ~/.oh-my-zsh/themes 可以查看一并下载好的内置主题。不过,我选择了开源的 powerlevel10k:
git clone --depth=1 https://github.com/romkatv/powerlevel10k.git ${ZSH_CUSTOM:-$HOME/.oh-my-zsh/custom}/themes/powerlevel10k
然后编辑 ~/.zshrc 文件,添加以下内容:
ZSH_THEME="powerlevel10k/powerlevel10k"
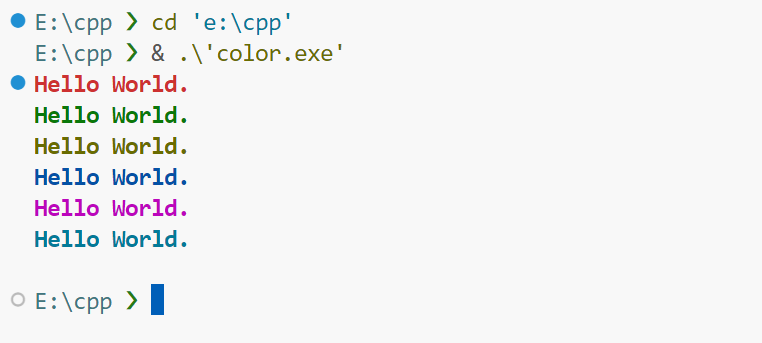
保存后,执行 source ~/.zshrc 使配置生效。此时,跟着引导依据自己的喜好进行配置即可。我的配置比较简约,效果如下:

如果对此轮配置不满意,可以输入 p10k configure 重新配置。
安装自动补全插件
最后,安装自动补全插件 zsh-autosuggestions 、语法校验插件 zsh-syntax-highlighting 和文件夹快捷跳转插件 z(自带,无需安装):
git clone https://github.com/zsh-users/zsh-autosuggestions ${ZSH_CUSTOM:-~/.oh-my-zsh/custom}/plugins/zsh-autosuggestions
git clone https://github.com/zsh-users/zsh-syntax-highlighting.git ${ZSH_CUSTOM:-~/.oh-my-zsh/custom}/plugins/zsh-syntax-highlighting
编辑 ~/.zshrc 文件,将上述插件添加到插件列表:
plugins=(git
        zsh-autosuggestions
        zsh-syntax-highlighting
        z)
保存后,执行 source ~/.zshrc ,配置完成。在 zsh 中输入命令时,可以按下右方向键 → 快速采用建议。
cmd
安装自动补全工具 Clink
cmd 的自动补全功能可由 Clink 工具实现。可以使用 winget 安装 Clink:
winget install clink
安装完成后,在 cmd 中输入 clink autorun install 允许 Clink 在启动终端时自动开始运行。Clink 也是通过按下右方向键 → 采用补全建议。
安装 oh-my-posh
可以使用 Clink 提供的 Lua API 配合 oh-my-posh 实现 cmd 的终端美化。Oh-my-posh 也可以通过 winget 安装:
winget install JanDeDobbeleer.OhMyPosh -s winget
最新的 oh-my-posh 主题也会一并下载(位于 C:\Users\user\AppData\Local\Programs\oh-my-posh\themes 中,可以在官方网站上预览主题样式。)
安装完成后,应将 oh-my-posh 添加到 PATH 环境变量中。在 PowerShell 中执行:
$env:Path += ";C:\Users\user\AppData\Local\Programs\oh-my-posh\bin"
一些主题的图标显示需要特定的字体 Nerd Font 支持,可以参见官方文档进行安装。由于我选择的主题不需要额外的字体支持,在此略过。
配置主题
接下来,运行 clink info,在输出的 Scripts 表项的第一个目录下(如果使用 winget 安装,应为 C:\Program Files (x86)\clink)创建一个包含如下内容的 oh-my-posh.lua 文件:
load(io.popen('oh-my-posh init cmd --config "C:/Users/user/AppData/Local/Programs/oh-my-posh/themes/powerlevel10k_lean.omp.json"'):read("*a"))()
其中,powerlevel10k_lean.omp.json 是我选择的主题的配置文件,可以根据喜好进行调整。如果要在 VS Code 等 IDE 中使用终端,建议将 oh-my-posh 改成绝对路径,否则主题可能无法正常显示:
load(io.popen('C:/Users/user/AppData/Local/Programs/oh-my-posh/bin/oh-my-posh.exe init cmd --config "C:/Users/user/AppData/Local/Programs/oh-my-posh/themes/powerlevel10k_lean.omp.json"'):read("*a"))()
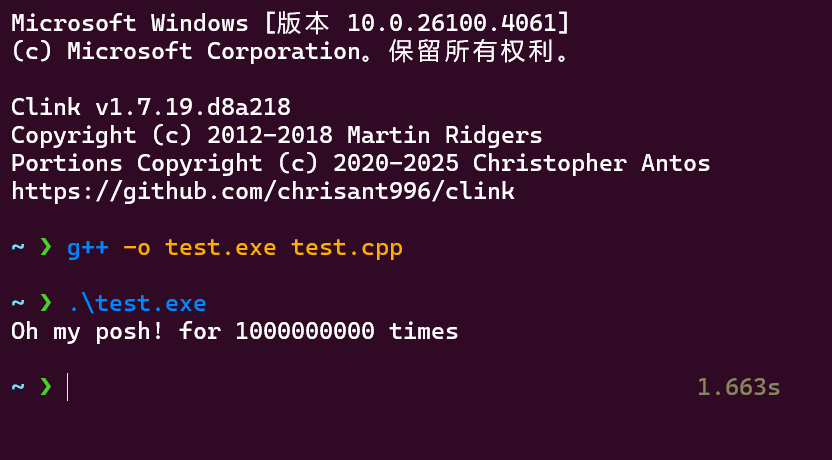
保存后重启 cmd,即可看到美化后的终端。
可选:自定义主题
也可以参考配置文档对主题文件进行个性化配置。例如,对于 oh-my-posh 提供的 powerlevel10k_lean 主题,虽然它与 powerlevel10k 风格一致,但是我不希望显示当前时间,而是像 zsh 那样显示命令的运行时间,于是我对主题文件进行了一些修改:
{
  "$schema": "https://raw.githubusercontent.com/JanDeDobbeleer/oh-my-posh/main/themes/schema.json",
  "blocks": [
    {
      "segments": [
        {
          "type": "executiontime",
          "style": "plain",
          "foreground": "#87875F",
          "template": "{{ .FormattedMs }} ",
          "properties": {
            "threshold": 500,
            "style": "austin",
            "always_enabled": false
          }
        }
      ],
      "type": "rprompt"
    },
    {
      "alignment": "left",
      "segments": [
        {
          "foreground": "#77E4F7",
          "properties": {
            "style": "full"
          },
          "style": "plain",
          "template": "{{ .Path }} ",
          "type": "path"
        },
        {
          "foreground": "#FFE700",
          "style": "plain",
          "template": "{{ .HEAD }} ",
          "type": "git"
        },
        {
          "foreground": "#43D426",
          "style": "plain",
          "template": "\u276f ",
          "type": "text"
        }
      ],
      "type": "prompt"
    }
  ],
  "version": 3
}
美化效果如下:
powershell
安装支持自动补全的 powershell
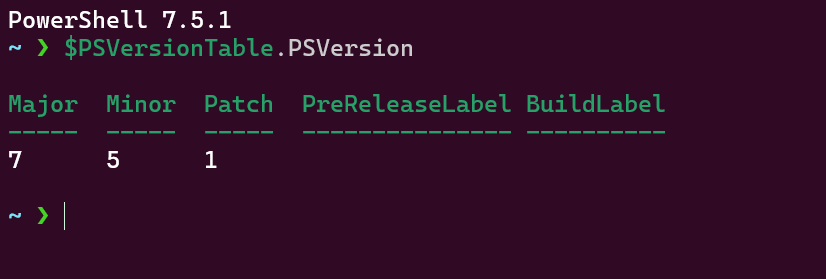
Powershell 在 2021 年发布的 7.2 版本更新了强大的智能预测和自动补全功能。可以使用 $PSVersionTable.PSVersion 查看当前的 Powershell 版本,如果低于 7.2,可以通过 winget 安装最新版本:
winget install --id Microsoft.Powershell --source winget
截止本篇博客发布时的最新稳定版本是 7.5.1。需要注意的是,新下载的 powershell 并没有覆盖原有的版本,应使用新的 PowerShell 7。Powershell 同样是通过右方向键 → 实现自动补全。
配置主题
首先,创建并打开配置文件:
New-Item -Path $PROFILE -Type File -Force
notepad $PROFILE
在配置文件中添加以下内容:
& ([ScriptBlock]::Create((C:\Users\user\AppData\Local\Programs\oh-my-posh\bin\oh-my-posh.exe init pwsh --config "C:\Users\user\AppData\Local\Programs\oh-my-posh\themes\powerlevel10k_lean.omp.json" --print) -join "`n"))
保存后,执行 . $PROFILE 使配置生效。重启终端,美化完成。
VS Code 终端也成功得到了美化。